LESSON 2
LESSON RECAP
Today we will be showing our ideas, shaping the final picture, step by step, with the help of other images: sketches, collages, and references. This process is called preliminary visualization. Or simply, "previsualization."
AS VISUAL ARTISTS, OUR GOAL IS TO BRING AN IDEA TO LIFE
- Why do we sketch, and what does a good draft look like?
- What's a digital collage? And how does it help to bring our ideas to life?
- How does a collage evolve into a proof-of-concept, and what other kinds of proofs-of-concept are there?
- What are reference images, and where should we look for them?
- What is the difference between a mood board and a photographer's treatment?
How can we turn a vague, ephemeral concept into a solid, real-world image? That can be a long journey! So we must start with small steps. In the previous chapter, we learned to express our ideas with words. But you know one of the main rules of the visual arts? Show us, don't tell us!
SKETCHING
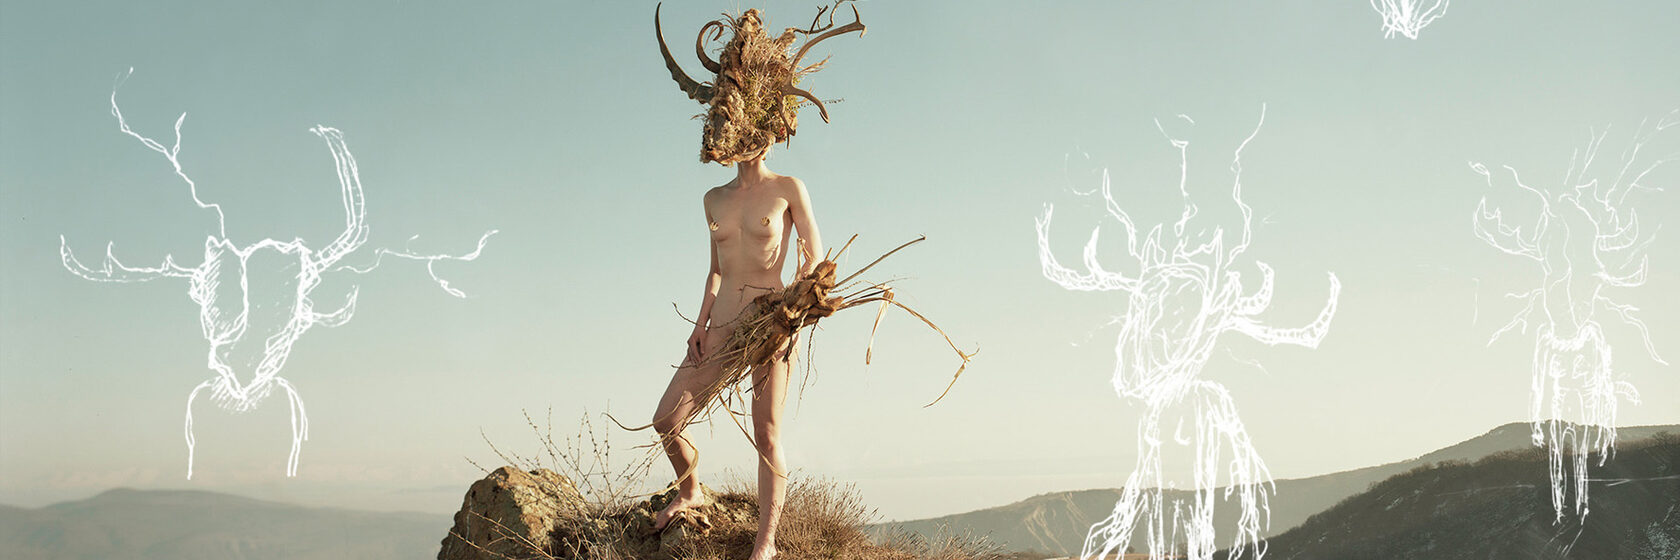
Previsualization is a method of thinking our picture through with images. It is visual thinking in its rawest form. Sometimes I just sketch out my ideas right onto a preliminary picture, to see how I could populate the frame and to see how different elements might work together.
I spend quite a lot of time shaping the idea in my head into an image: first with broad strokes, then with more precision and detail. A sketch can be very, very approximate and rough. Maybe it won't even make much sense to someone else. But what matters is that these scribbles ignite your own process of visual thinking. And when you see the final picture, these drawings become much more evident.
Sometimes a random piece of paper is all you need in order to sketch an idea, but most of the time, I try to use dedicated sketchbooks. Writing and drawing in these books helps me organize my thoughts, formulate questions, and pinpoint ideas for future shoots.
Sometimes I sketch just for myself. It doesn't matter if the others won't understand what is drawn here. Until, of course, they see the outcome!
In other cases, I would use drawings to explain something to my team members. To discuss my ideas with the people who will be helping me bring them to life. These drawings can define character design, overall composition, and help set the direction of our set-design, styling and props construction ideas.
It doesn't really matter if your sketches are close to the resulting pictures or not. What matters is that they help us start this process of visual thinking.
Over time, the process of previsualizing your ideas with sketches will start to become more detailed, more precise, and closer to the outcome. You will get better at envisioning your ideas and predicting the result of your work, which is crucial for complex portrait photography.
THE DIGITAL COLLAGE
The digital collage is the next evolution of the napkin sketch. The process involves combining various pieces of different reference material into one digital image. The goal is to assemble a collage that shows your idea with real-life details and in a realistic setting.
This was my first attempt at making a digital collage for one of my early projects. I never finished that project, though we made a mask based on the collage. It was after seeing this mask that I realized how powerful this tool can be.
With time my collages started to become more elaborate, more complex, and more visually appealing. I made sketches for myself and my team, and collages primarily for the client.
But even for my personal projects, I would sometimes invest time and efforts to previsualize the shot that I have in mind, not only with a sketch but also with a digital collage. What is also important is that a collage becomes a starting point for the mood board that later defines a project (we'll get to mood boards later in this chapter).
A digital collage is one of the most powerful and most accurate tools of previsualization. But we shouldn't forget that it's just an advanced sketch. And a sketch, no matter how good it is, is not the final picture. After previsualization is done, you might get new ideas — even during actual production. Don't be afraid to step away from your sketches and collages to improvise if you see an opportunity.
THE PROOF
OF CONCEPT
OF CONCEPT
Most of my collages exist to illustrate my ideas. But many of them also have a second important purpose: to prove an idea's feasibility. To confirm that what I have in mind is actually doable. This is called a proof of concept.
THE MOOD BOARD
Reference images are usually someone else's pictures that you use to illustrate a certain side of your idea. When you gather together the best reference images and arrange them in a specific order, this is called a mood board. Mood boards are useful in defining specific aspects of your project: atmosphere, color palette, lighting, special effects, poses, costume, make-up, props, set design, and others.
A mood board can be a stack of magazine cutouts pinned to a wall. It can be a bunch of files in a folder on your computer. Or a well-formatted PDF with two dozens pages. My mood boards start on Pinterest. I create a secret board where I pin everything I see that somehow fits the project.
The larger is the project and the bigger the team, the more detailed your mood board will need to be.
THE PHOTOGRAPHER'S TREATMENT
If the mood board is primarily meant for you and your team, a photographer's treatment is something we use to communicate our idea to the client. Sometimes, it is difficult to tell a photographer's treatment from a mood board. But generally speaking, it contains fewer specific details and focuses more on your broad vision, and your approach to this particular project.
Consider the treatment as a pitching tool meant for the presale. You need it before a client approves you for their project. It's a tool that lets us share our vision with people who don't know us. In that sense, it's an opportunity to show your train of thought, your approach to resolving this particular client's need.
The more time, effort, and attention we invest in our treatments, the more inclined the client will be to hire us for the project.
LESSON 2 ASSIGNMENTS
1. SKETCH, DIGITAL COLLAGE, MOOD BOARD
Create a sketch of your course project idea, and then a digital collage based on this sketch, and then a mood board for the whole project.
SKETCH
Your sketch doesn't have to be a detailed drawing—the important thing is that it helps you start envisioning what your final photograph will look like. It can be messy, but remember that you are also making this sketch for someone else to understand.
DIGITAL COLLAGE
Using reference material and based on your sketch, I want you to build a digital collage that represents your scene.
MOOD BOARD
For the mood board, gather reference material onto a dedicated Pinterest board. When you feel that you have enough reference images, choose the best and assemble them into a PDF presentation, as if you were doing it for your team. The mood board should be packaged as a stand-alone document that doesn't require additional explanation. Feel free to use short text or keywords as necessary.
A good rule to follow for your mood board is to dedicate one page to each aspect of the shoot. So one page that shows the overall visual style, then another page for costume and wardrobe, another for lighting, another for set design, and so on.
Format: 1–5 pictures for the sketch(es), 1-5 picture for the digital collage(s), and a PDF file for the mood board. Plus 3-4 sentences of text about the production process
Deadline: February 11, 2022
Delivery: JPG files for the images (2048 pixels on the long side, up to 2MB file size). PDF file (up to 10MB file size)
Deadline: February 11, 2022
Delivery: JPG files for the images (2048 pixels on the long side, up to 2MB file size). PDF file (up to 10MB file size)
ASSIGNMENT #1
2. A PORTRAIT WITH A BRIEF
Shoot a portrait using one of the three briefs I provide in the links below. You are free to interpret the brief however you choose, so I encourage you to experiment!


- An editorial portrait for a glossy magazine (PDF, 3.8MB)
- A cover of an autobiography book for a publishing house (PDF, 4MB)
- A promo image for a fashion designer (PDF, 7.3MB)
Format: One photo, shot and edited by you, and a 3-4 sentences of text about the production process
Deadline: February 11, 2022
Delivery: Upload a JPG file (2048 pixels on the long side, up to 2MB file size) via the assignment form below, and copy your text into the available field
Deadline: February 11, 2022
Delivery: Upload a JPG file (2048 pixels on the long side, up to 2MB file size) via the assignment form below, and copy your text into the available field
ASSIGNMENT #2
NEED HELP?
If you need help, have a question, want to share your idea and get my feedback — send me a note!
Everything that you see on this website was developed, produced, filmed, edited, structured and designed by Andrei Kovalev and his team, in collaboration with the Spéos Photo School. Please do not copy or redistribute it.