LESSON 12
LESSON RECAP
So far in this course, we've been talking mostly about a process for shooting photographs that is built around producing a finished result. A completed image. It goes roughly like this: You start with concept development and research, then comes pre-production planning, then production, editing, and, finally, delivery.
This isn't just my approach, it's a method that's been tried and tested, over and over again, in some form since the invention of photography. And probably for thousands of years before that!
It's a method that's focused on producing reliable results, either for a client, or an exhibition, or some other deadline. I like to think of this as the craft of photography. It's very effective, and it is absolutely necessary if you want to build a career shooting photographs for other people.
But what about the other side of photography, what about the art of photography? What about expression, and exploration, and innovation? When do we get to wander and experiment, without having to worry about budgets and deadlines?
In my practice, art and craft are locked in a kind of endless dance. Sometimes I'm focused on client projects, other times I'm working on personal experiments. The goal is to find balance, but how do we do that? And where does innovation come into the picture? Today we're going to talk about how this plays out in my practice. And, how it can work for you.
EXPLORATION FOR EXPLORATION
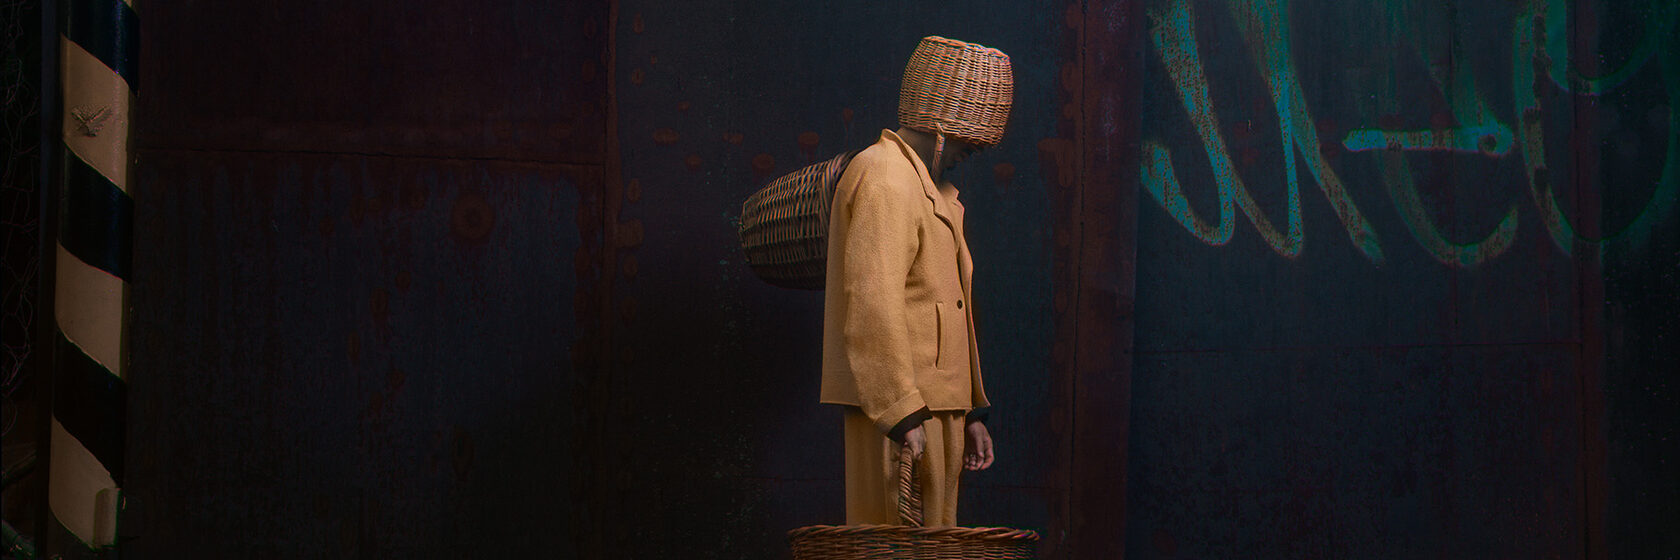
If you want to grow as an artist, you have to give yourself space to explore. You have to allow yourself to experiment without deadlines or limitations, and without a specific destination in mind. Let's take a look at some of my explorations. These are some of the things I used, motivated by nothing other than curiosity to learn about a new tool or technique.
With digital cameras the effect can be much more deliberate, allowing you to combine pictures in a more thoughtful way. It's interesting to compare the digital effect to the results we get when we shoot on film. I have to say that there's an excitement in the randomness of the film effect that I find is almost impossible to replicate digitally.
- DIGITAL TO FILM
- LENS-BASHING
- IR FILTER
- MULTIPLE EXPOSURE (FILM > DIGITAL)
With digital cameras the effect can be much more deliberate, allowing you to combine pictures in a more thoughtful way. It's interesting to compare the digital effect to the results we get when we shoot on film. I have to say that there's an excitement in the randomness of the film effect that I find is almost impossible to replicate digitally.
EXPLORATION FUELS CRAFT
I've done experiments like these for years, usually motivated by nothing other than my own curiosity about a new tool or effect. But I don't see them as something separate from my professional practice. In fact, it's just the opposite: I try to incorporate these experiments into my practice as much as possible!
Imagine you're a creative director at a big company. Every month you've got 15 or 20 different photo shoots to produce. For most of these shoots, you don't need images that are brilliant and innovative. You don't need art. You just need content that is technically solid and not out of place among the current trends. So you commission photographers whose practice focuses mostly on the craft of photography. Photographers who you know will deliver solid, reliable results.
But then one day one of your art directors comes to you with a crazy idea for a high-concept photo shoot, something new and different that will stand out. Something innovative. Are you going to turn to one of your craftsmen photographers to produce this? Or are you going to find someone who's portfolio shows exploration and experimentation? Someone who you can see is curious and has built their career on thinking outside the box?
This photographer could be you. But only if you've integrated your personal exploration and experimentation into your commercial work.
Let's take a look at some examples:
GREENSCREEN TO COLOR
Greenscreen is often the tool of choice if you need to place your subject in another reality. But before I used it on a big client shoot, I was experimenting with something simpler, like changing the color of the background.
It wasn't long before I used this technique on a book cover, commissioned by a French publishing house. We could have just shot it against a red background, so why the greenscreen? The reason was that the client wanted to have options for the background and decide on the color later. So my previous greenscreen experiments came in handy here.
Eventually I began using greenscreen on client shoots in much more complex ways. If I hadn't shot those small greenscreen experiments in the beginning, I wouldn't have been able to offer this technique as a solution for these shoots.
DIY ANAMORPHIC MODIFIER > ANAMORPHIC LENSES
I always dreamed of my photographs looking like stills from a movie. And I've experimented with all kinds of different techniques over the years to make my pictures seem more cinematic. One the tools that I was most excited was anamorphic lenses.
Anamorphic lenses come from cinematography and give us the effect we've seen in so many wide-screen films: horizontal lens flares, wide angles with minimal distortion, and shallow depth of field.
Anamorphic lenses are also incredibly expensive to rent. So for my first experiment I used an old Soviet lens from a film projector, modified so it could be used with a camera.
It wasn't too long before I had a chance to use an anamorphic lens on a client project.
This time we used Lomo anamorphic lenses designed for cinema cameras, which were much more reliable. We shot the lens flares separately with the same lens and added them later in post-production. These images were possible because of my previous experiments!
COLLAGE
In my collage experiments I wanted to see what was possible if the photograph was only part of the image. There's something very liberating about working with photos in a tactile, physical environment, rather than just as images on the screen.
SHOOTING FILM
I started exploring shooting on film from a very early point in my career. As I experimented, I realized that film is no better or worse than shooting on digital—it's simply another tool for your toolbox. And depending on the project, it can be very powerful!
Eventually these explorations allowed me to start proposing this medium for client shoots. It's not the right solution for every project, but for some it's the perfect fit. And when these projects come, you need to know how to use it.
Shooting on film requires a certain level of technical skill that can be learned only with practice. Before taking it to commercial projects, you must flex this muscle on your own through exploration and experiments.
CRAFT FUELS EXPLORATION
I see a lot of photographers who try to separate their artistic practice from their craft, from their paid photo work. You can even see it on their websites: one page for client work, and another for artistic personal work. And I also used to do this.
But then I realized that I had it all wrong. I realized how important it is to not separate these two things. How important it is to do everything you can so that your art and your craft can work together to build your career and help you grow.
Do you want clients to hire you based only on the work you've done for other clients? This will only lead to more work that looks the same. Or do you want them to hire you for your vision as an artist? For your willingness to take risks, think outside the box, and innovate?
So many photographers talk about doing client work so that they can then afford to do their personal work. But it doesn't have to be this way! If you invest in your own exploration as a photographer, and position this work not as a side project or a "test," but as an important part of your practice, you will attract clients who will allow you to use your artistic discoveries on their shoots!
What we want is to create a cycle where our art feeds our craft, and our craft feeds our art.
FLOW
Around 2018 I noticed that the line separating my personal experiments from my professional client work had almost entirely disappeared. This isn't by accident of course. Earlier in my career I was always struggling to balance my art and my craft, as if I was two different photographers. But now they had finally started to merge naturally in a state of flow.
Clients normally hire photographers to produce a set of pictures for them. I was being commissioned to create visual solutions, to bring my artistic vision to their projects.
All of these examples are designed to show how important it is to do everything you can to merge your art and your craft. The goal is to reach a point where they are no longer distinguishable from one another, where ideas flow seamlessly from project to project, some having clients, others shot in your living room on no budget with your friends as models.
Don't think of yourself as a photographer whose job it is to take pictures for clients. Think of yourself as a visual artists who provides solutions. Photography may be your area of specialization, but there is no rule that says you are limited to taking conventional photographs. Let go of what the industry thinks a photographer should be. Because this will only lead to producing conventional work. Allow yourself to think outside these limitations. Develop the discipline to continually ask yourself, "How can we take this to the next level."
LESSON 12
ASSIGNMENT
ASSIGNMENT
THINKING OUTSIDE THE BOX
Shoot a portrait according to one of the client briefs linked to below. I don't want you to submit a conventional photograph—I want you to come up with a solution that is new and bold. Something "beyond the brief."
Don't forget to edit the picture before submitting. As always, drop me a note if you have questions.
Don't forget to edit the picture before submitting. As always, drop me a note if you have questions.
→ Shooting briefs (PDF, 6.2 Mb)
Format: One photo, shot and edited by you, and a 3-4 sentences of text about the production process
Deadline: April 24, 2022
Delivery: Upload a JPG file (2048 pixels on the long side, up to 2MB file size) via the assignment form below, and copy your text into the available field
Deadline: April 24, 2022
Delivery: Upload a JPG file (2048 pixels on the long side, up to 2MB file size) via the assignment form below, and copy your text into the available field
ASSIGNMENT #1
NEED HELP?
If you need help, have a question, want to share your idea and get my feedback — send me a note!
Everything that you see on this website was developed, produced, filmed, edited, structured and designed by Andrei Kovalev and his team, in collaboration with the Spéos Photo School. Please do not copy or redistribute it.